
 Pin it
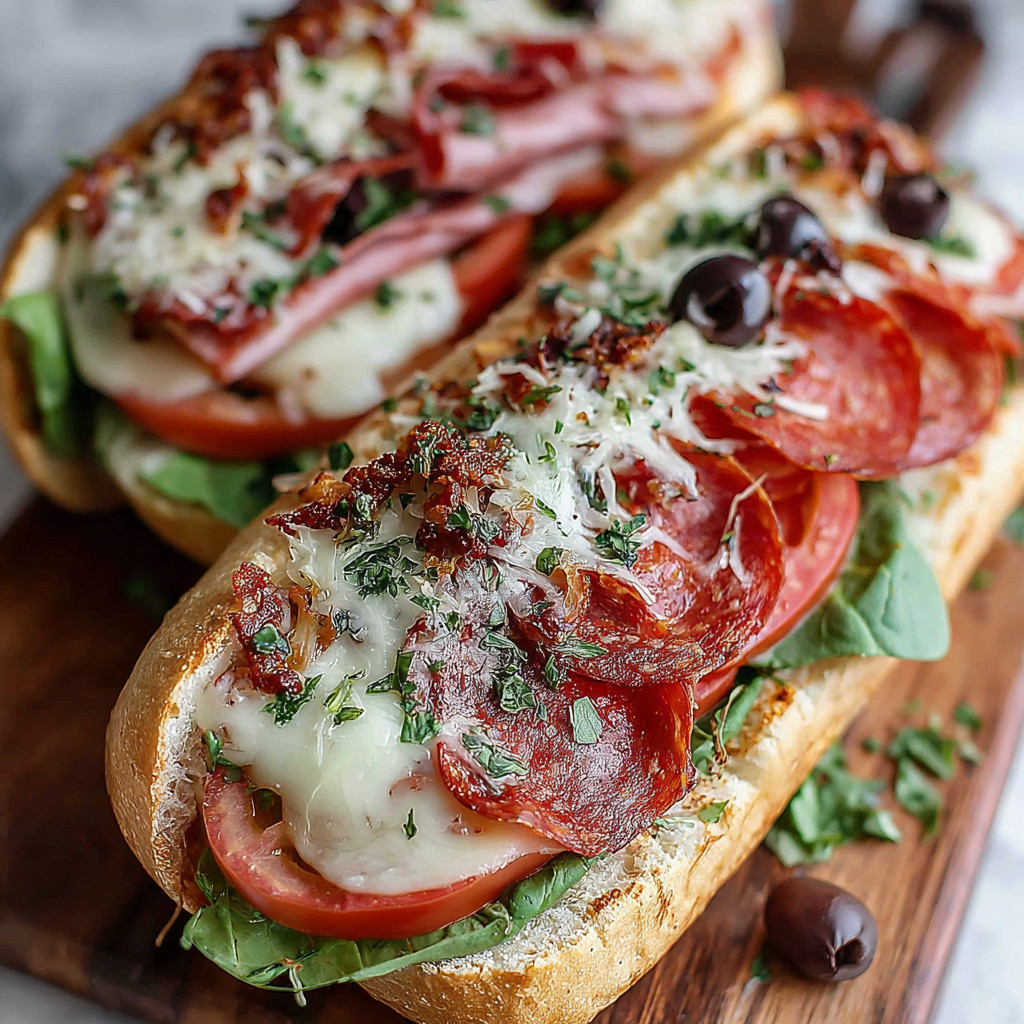
These baked Italian sub sandwiches bring together layers of savory meats, melty cheese, and tangy banana peppers for a warm and satisfying meal. They are perfect for a quick weeknight dinner or a casual get-together with friends, offering a blend of textures and flavors that is hard to resist.
Ingredients
- Hoagie rolls or sub buns: provide the sturdy base that holds all the fillings together—choose fresh ones with a soft inside and slightly firm crust
- Salami slices: bring a spicy, savory punch; look for good quality cured salami for best taste
- Pepperoni slices: add a familiar tangy and slightly smoky flavor—opt for slices that are not too thick so they heat evenly
- Ham or capicola slices: contribute a mild, salty note to balance the stronger meats—select from deli counters for freshness
- Provolone or mozzarella cheese: melts beautifully for gooey texture and mild creaminess—pick slices that are not overly processed
- Banana peppers: introduce a bright, tangy zip that cuts through the richness; jarred ones work well but look for crisp pickled peppers
- Sliced onions: add crunch and subtle sharpness—red or white depending on your preference
- Black olives: are optional but provide a salty briny contrast; choose ripe black olives packed in brine, drained before use
- Mayonnaise or mustard: can be spread to add moisture and flavor; choose quality mayo or Dijon mustard for a smoother taste
- Lettuce and tomato: added after baking bring freshness and lightness to each bite—opt for crisp Romaine or iceberg and ripe, firm tomatoes
- Butter, garlic, and parsley: combine to make a fragrant garlic butter that enhances the bread when brushed inside the buns
Step-by-Step Instructions
- Preheat Oven:
- Set your oven to 375 degrees Fahrenheit to ensure it reaches the right baking temperature while you assemble the sandwiches. This temperature will melt the cheese perfectly without drying out the bread.
- Prepare Rolls:
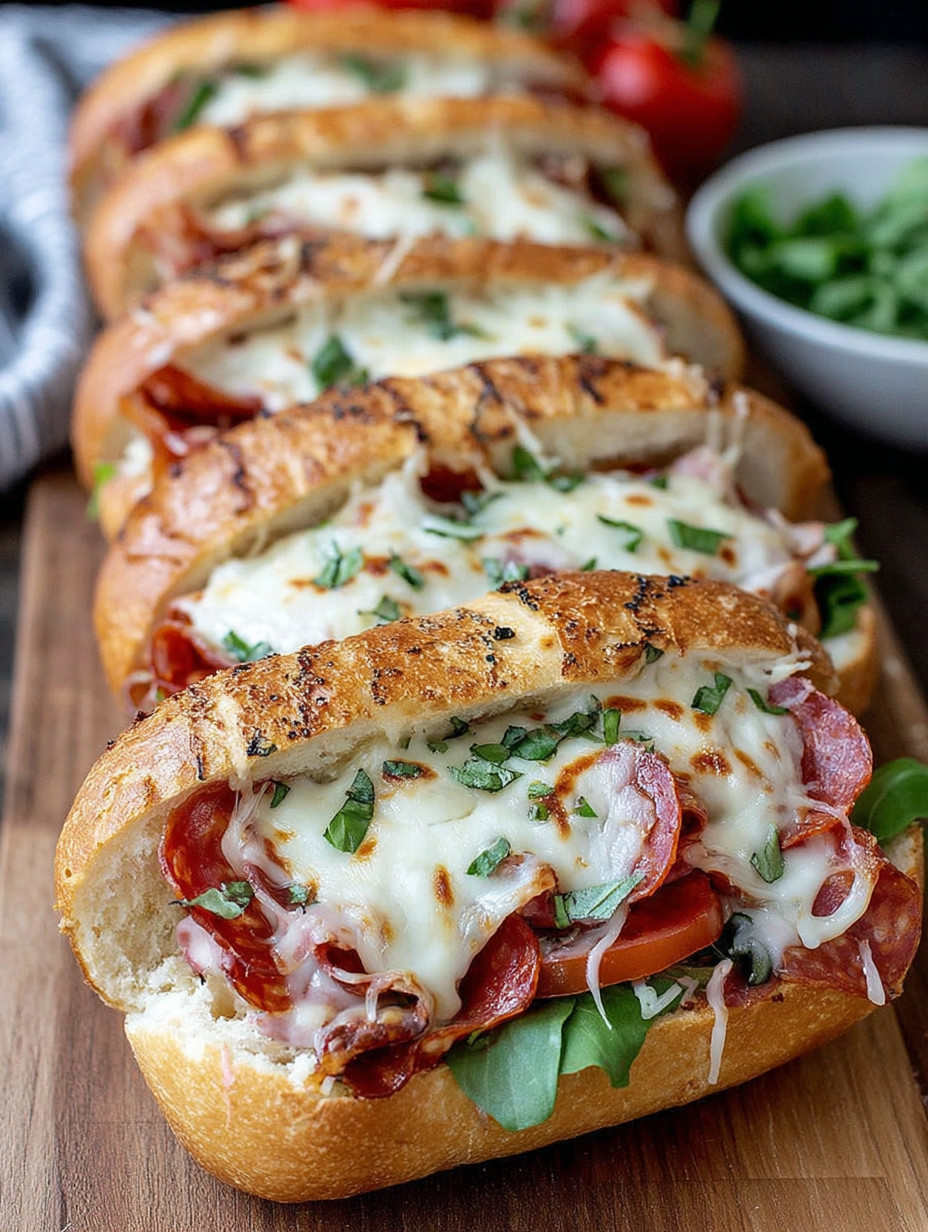
- Carefully slice the hoagie rolls lengthwise but keep one side attached so the fillings stay in place like a pocket. Mix melted butter with minced garlic and chopped parsley to create a fragrant garlic butter. Lightly brush the inside of each roll with this mixture to add flavor and keep the bread moist during baking.
- Layer Fillings:
- Inside each prepared roll, arrange the salami, pepperoni, and ham or capicola slices evenly to cover the bread. Place the slices of provolone or mozzarella cheese on top of the meats for that signature melty texture. Add banana peppers, sliced onions, and if you like, black olives to give the sandwich a bright and savory contrast. If you choose, spread mayonnaise or mustard over the fillings for extra flavor and moisture.
- Bake:
- You have two options here depending on your texture preference. Wrap the sandwiches tightly in foil and bake for 15 to 20 minutes to achieve a warm and gooey melt with softer bread. Or place them uncovered for a crispier crust and golden brown finish. Both work great so pick what suits your mood.
- Finish and Serve:
- Once baked, remove the sandwiches from the oven and carefully unwrap if foil was used. Add fresh lettuce and tomato slices inside each sub to provide a crisp, refreshing balance to the warm fillings. Serve while still warm alongside crunchy chips or a light green salad for a complete meal.
 Pin it
Storage Tips
These sandwiches are best enjoyed fresh from the oven but can be stored in an airtight container in the refrigerator for up to two days. To reheat, wrap them in foil and warm in a 350 degree Fahrenheit oven until cheese is melted again. Avoid microwaving if possible to keep the bread from getting soggy.
Ingredient Substitutions
Feel free to swap any of the cured meats depending on what you have at home such as turkey, roast beef, or even vegetarian deli slices to customize it to your taste. Cheese options could include cheddar or Swiss though provolone or mozzarella offer the best melt. If you don’t have banana peppers, mild pickled pepperoncini are a good substitute.
Serving Suggestions
 Pin it
Pair these subs with kettle-cooked potato chips or a crisp garden salad tossed with simple vinaigrette. For a heartier meal, serve with a cup of tomato soup or a side of roasted vegetables. They also make a crowd-pleasing party platter cut into smaller portions with toothpicks.
Frequently Asked Questions
- → What kind of bread works best for these subs?
Hoagie rolls or sub buns that can hold fillings without falling apart work best. Look for soft rolls with a sturdy crust.
- → Can I substitute the meats in the sandwich?
Yes, you can swap salami, pepperoni, and ham with similar deli meats like capicola or turkey to suit preference.
- → How do I achieve a crispy crust versus a softer sandwich?
Baking the subs uncovered produces a crisp crust, while wrapping them tightly in foil keeps them soft and gooey.
- → Is it better to add lettuce and tomato before or after baking?
Adding lettuce and tomato after baking preserves their fresh crunch and prevents wilting under heat.
- → What role does the garlic butter have in the sandwich?
Brushing melted garlic butter inside the rolls adds moisture and a savory depth that complements the meats and cheese.